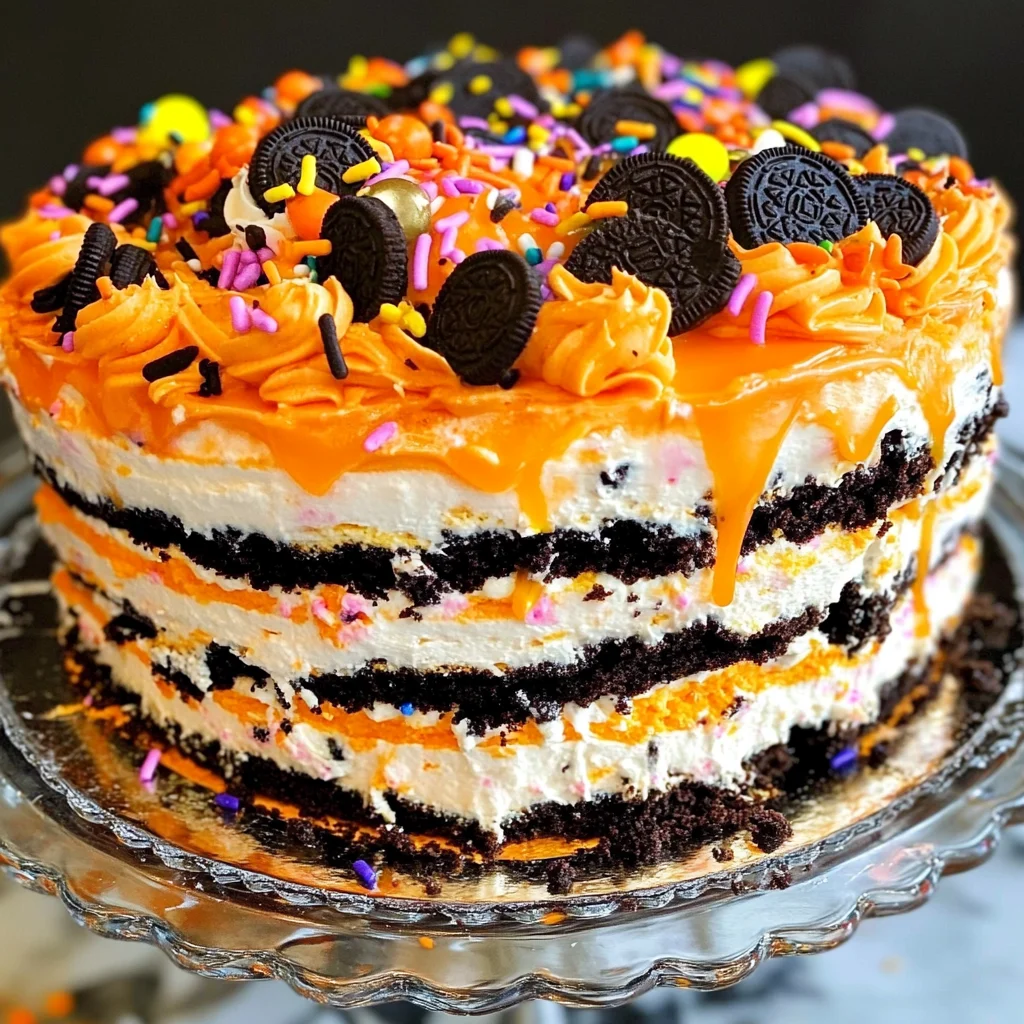
Halloween Icebox Cake
Halloween Icebox Cake is a delightful no-bake dessert that brings festive cheer to any gathering. This cake features layers of Oreo cookies and homemade whipped cream, making it an easy yet impressive treat for Halloween parties or family celebrations. Its vibrant orange hues and fun decorations make it visually stunning while delivering on flavor. Enjoy the simplicity of assembling this cake, chilling it, and then reveling in the delicious results!
Why You’ll Love This Recipe
- No-Bake Convenience: This Halloween Icebox Cake is quick to prepare and requires no baking, making it perfect for busy schedules.
- Customizable Flavors: You can easily adjust the shades of orange to fit your theme or even add different flavors to the whipped cream.
- Crowd-Pleaser: With its creamy texture and chocolatey crunch from the Oreos, this dessert is sure to impress guests of all ages.
- Perfect for Celebrations: Whether it’s a Halloween party or a family gathering, this cake adds festive flair to any occasion.
- Easy Assembly: Assemble in just a few steps! Simply layer cookies and whipped cream for a striking dessert.
Tools and Preparation
Having the right tools makes preparing your Halloween Icebox Cake easier and more enjoyable. Here’s what you’ll need:
Essential Tools and Equipment
- Stand mixer or hand mixer
- 9-inch springform pan
- Spatula
- Mixing bowls
- Plastic wrap or parchment paper
Importance of Each Tool
- Stand mixer or hand mixer: Essential for whipping heavy cream quickly to create fluffy peaks.
- 9-inch springform pan: Ideal for easily removing your icebox cake without damaging its layers.
- Spatula: Perfect for spreading whipped cream evenly across each layer, ensuring a beautiful presentation.

Ingredients
To create this delightful Halloween Icebox Cake, gather the following ingredients:
For the Whipped Cream
- 4 cups heavy whipping cream (1 Qt)
- 1 teaspoon vanilla extract
- 1 cup powdered sugar
- Orange food coloring (I use gel food coloring)
For the Layers
- 2 (14.5 ounce) package Oreo cookies (you need about 42 cookies total plus more to fill any spots; 1 package brings 36 cookies)
For Decoration
- Orange icing
- Sprinkles
How to Make Halloween Icebox Cake
Step 1: Prepare Your Pan
Line a 9-inch springform pan with plastic wrap or parchment paper so that it sticks out about an inch above the sides of the pan. This will make it easier to remove your cake later.
Step 2: Whip the Cream
In the bowl of an electric mixer using a whisk attachment:
1. Combine heavy whipping cream, vanilla extract, and powdered sugar.
2. Whisk on high speed until stiff peaks form, which takes about 5 minutes.
Step 3: Color the Cream
Divide the whipped cream into three mixing bowls:
1. Add orange food coloring to each bowl and gently fold in until fully mixed.
2. Make each bowl a different shade of orange, from light to dark.
Step 4: Layer Cookies and Cream
- Place a single layer of Oreo cookies into the bottom of the prepared pan. Feel free to add broken pieces in between gaps if desired.
- Top with one-third of the darker shade of whipped cream, spreading evenly with a spatula.
Step 5: Repeat Layers
- Add another layer of Oreo cookies on top.
- Spread one-third of the second shade of whipped cream evenly over this layer.
Step 6: Final Layer and Chill
- Finish with another layer of Oreo cookies, followed by the remaining whipped cream on top.
- Cover with plastic wrap and refrigerate for at least 6 hours or overnight.
Step 7: Decorate Before Serving
Once chilled, remove from refrigerator:
1. Carefully take off plastic wrap.
2. Decorate with orange icing and sprinkles as desired before serving.
Enjoy this delightful Halloween Icebox Cake at your next celebration!
How to Serve Halloween Icebox Cake
Serving your Halloween Icebox Cake can be a fun and creative experience. Here are some delightful ways to present this no-bake dessert that will impress your guests.
Individual Portions
- Use small cups or jars to serve individual portions of the icebox cake. This makes it easy for guests to enjoy without needing to slice the cake.
Garnished Slices
- After slicing the cake, top each piece with additional orange icing and sprinkles. This adds a festive touch that enhances its Halloween theme.
Layered Dessert Cups
- Create layered cups using crushed Oreo cookies and whipped cream. Alternate layers of cookie crumbs and whipped cream for a visually appealing treat.
Party Platter
- Present the whole cake on a decorative platter surrounded by extra Oreo cookies and festive candies. This creates an inviting centerpiece for your dessert table.
How to Perfect Halloween Icebox Cake
To ensure your Halloween Icebox Cake is a showstopper, follow these simple tips.
- Use cold ingredients: Start with chilled heavy cream for better whipping results.
- Layer correctly: Alternate between cookie layers and whipped cream for even texture and flavor distribution.
- Chill adequately: Refrigerate the cake for at least 6 hours or overnight to achieve optimal firmness.
- Decorate last minute: Add icing and sprinkles just before serving to keep them fresh and vibrant.
Best Side Dishes for Halloween Icebox Cake
Pairing side dishes with your Halloween Icebox Cake can enhance the overall dining experience. Here are some great options:
- Pumpkin Soup: A warm, creamy pumpkin soup serves as a comforting starter that complements the sweetness of the dessert.
- Apple Salad: Crisp apple slices mixed with nuts and a light dressing provide a refreshing contrast to the rich cake.
- Spooky Veggie Platter: Arrange seasonal veggies in fun shapes, such as ghosts or pumpkins, served with hummus for dipping.
- Cheese Board: A selection of cheeses, crackers, and fruits adds variety and sophistication to your dessert table.
- Chocolate Covered Strawberries: These sweet treats offer a fruity balance while keeping with the Halloween theme.
- Caramel Popcorn: The sweet crunch of caramel popcorn is a delightful snack that pairs well with the creamy icebox cake.
Common Mistakes to Avoid
When making your Halloween Icebox Cake, it’s easy to run into a few common pitfalls. Here are some mistakes to watch out for:
- Not chilling long enough: If you don’t refrigerate the cake for at least 6 hours, it won’t hold its shape when sliced. Always aim for an overnight chill for best results.
- Using too much food coloring: Overdoing it with food coloring can lead to artificial-looking layers. Start with a small amount and add gradually until you achieve your desired shade.
- Skipping the whipped cream stiff peaks: Failing to whip the cream to stiff peaks can result in a runny cake. Make sure to whisk until peaks form firmly.
- Ignoring cookie gaps: Leaving large gaps between cookies can make the cake unstable. Add broken pieces of Oreos to fill any spaces for better structure.
- Rushing assembly: Taking your time while layering is crucial. Ensure each layer is even and well spread to avoid a messy final presentation.
Storage & Reheating Instructions
Refrigerator Storage
- Store any leftovers in an airtight container.
- The Halloween Icebox Cake will keep fresh for up to 5 days in the refrigerator.
Freezing Halloween Icebox Cake
- Wrap tightly in plastic wrap or aluminum foil before freezing.
- It can be frozen for up to 2 months. Thaw in the refrigerator overnight before serving.
Reheating Halloween Icebox Cake
- Oven: It’s not recommended to use the oven as this cake is best served cold.
- Microwave: If you prefer it slightly softened, microwave individual slices for about 10-15 seconds on low power.
- Stovetop: Not applicable since this dessert should remain chilled.
Frequently Asked Questions
Here are some common questions about making and enjoying your Halloween Icebox Cake:
Can I use different cookies for my Halloween Icebox Cake?
Yes! While Oreo cookies are traditional, feel free to experiment with other cookies like chocolate wafers or graham crackers for different flavors.
How can I customize my Halloween Icebox Cake?
You can add layers of fruit, chocolate chips, or nuts between the whipped cream layers. This adds texture and flavor variations!
How do I prevent my cake from getting soggy?
Ensure that you allow the whipped cream and cookies to set properly in the refrigerator. Also, avoid excessive moisture when layering.
Can I make this gluten-free?
Absolutely! Just substitute regular Oreos with gluten-free Oreos and ensure all other ingredients are gluten-free.
Final Thoughts
The Halloween Icebox Cake is a fun and festive dessert perfect for any celebration. Its no-bake nature makes it easy to prepare, while its colorful layers invite creativity. Don’t hesitate to customize it with your favorite flavors or toppings!
Halloween Icebox Cake

Indulge in the festive spirit with this Halloween Icebox Cake, a delightful no-bake dessert that’s perfect for your spooky celebrations. Layers of creamy whipped cream, vibrant orange hues, and crunchy Oreo cookies create an impressive centerpiece that’s both easy to make and a joy to share. This cake is not only visually stunning but also offers a rich chocolate flavor that will captivate guests of all ages. Simply assemble the layers, chill, and you’re ready for a delicious treat that embodies the essence of Halloween!
- Prep Time: 30 minutes
- Cook Time: None
- Total Time: 0 hours
- Yield: Serves approximately 12 1x
- Category: Dessert
- Method: No-Bake
- Cuisine: American
Ingredients
- 4 cups heavy whipping cream
- 1 teaspoon vanilla extract
- 1 cup powdered sugar
- Orange food coloring
- 2 packages of Oreo cookies (about 42 cookies total)
- Orange icing for decoration
- Sprinkles for decoration
Instructions
- Line a 9-inch springform pan with plastic wrap or parchment paper.
- In a mixing bowl, whip heavy cream, vanilla extract, and powdered sugar on high speed until stiff peaks form (about 5 minutes).
- Divide whipped cream into three bowls and mix in different shades of orange food coloring.
- Layer Oreo cookies at the bottom of the pan, followed by one-third of the darkest whipped cream layer. Repeat with remaining cookie and whipped cream layers.
- Finish with a final layer of cookies topped with the remaining whipped cream.
- Cover and refrigerate for at least 6 hours or overnight.
- Decorate with orange icing and sprinkles before serving.
Nutrition
- Serving Size: 1 slice (approximately 85g)
- Calories: 320
- Sugar: 26g
- Sodium: 50mg
- Fat: 27g
- Saturated Fat: 17g
- Unsaturated Fat: 8g
- Trans Fat: 0g
- Carbohydrates: 22g
- Fiber: 1g
- Protein: 3g
- Cholesterol: 80mg